Date: 25th November 2025
We welcome a lot of visiting and new local ice and winter alpine climbers to the Canadian Rockies every winter for a simple reason: It’s the best ice climbing in the world on average. We have a unique combination of consistent, highly varied climbs from bolted mixed dragging to alpine romps to super sketchy mixed routes, and access ranging from roadside to multi-day death marches. Be careful what you ask for because you’ll probably get it and then some in the Canadian Rockies. Ice climbing here can be sunny casual on some days, but on other days, well, shit gets very real, very fast. We generally have a lot of avalanche hazard on the vast majority of our climbs, solid professional but slower rescue service than the Alps, short days, bad roads, wind, cold, dark, etc. Figuring out what to climb in what conditions can be tricky.
Start here for a big picture look at how our season generally runs. We can generally climb water ice about ten months a year, with “decent” conditions generally running from mid-October until most people are sick of ice, around April 1, but there’s usually something left to climb into early June.
Quick Workflow Overview:
1. Start on avalanche.ca for avalanche danger forecasts. That hazard level and the terrain determines where to climb, not what I want to climb. Also look at it for winds, the Ice Atlas, new snow, general mountain forecast, MIN reports, etc. etc, it’s just great.
2. Look at the public weather forecasts for Canmore, Lake Louise, Jasper, and maybe Radium.
3. Look at social media, see below. With the MIN this should give a pretty good idea of what’s going on.
4. Research. Use the Ice and Mixed App for location info etc. Short list a few climbs.
5. Pull a Spot WX specific forecast for your potential climb. If you don’t use this already learn it, it’s great. Look at the winds at various levels.
6. Check road conditions.
7. If climbing in terrain that can slide bring avalanche gear at least to the base.
8. Bring satellite coms. Some phones work some of the time sometimes. Bring a dedicated sat com device.
9. Ice Climber’s code. Yes.
10. Send and Survive.
Detailed Workflow Overview:

Step 1: Avalanche Canada Map
Avalanches have killed far more winter climbers in the Rockies than anything else. On average, a climber dies here in a slide every year. This site is the critical overview for many snow-related resources, not just what the avalanche hazard is. Right away you can see the colours representing from “Low” to “Extreme.” Most places in Western North America have similar sites. The areas in these forecasts are generally in the range of 100km north-south, so they are very broad generalizations, but still a critical place to start for many reasons. I like to click on each forecast area that I might climb in, from Jasper to Kananaskis country or so, and then scroll down to the “specific problems” sections and all the relevant information there. The detail matters, and will help understand how the forecaster was thinking who wrote it.
Rule of Thumb (ROT) 1: For ice climbers, add at least one “level” to the danger rating scale. The CMOH (conceptual model of avalanche hazard) that drives the ratings is built around the size and probability of slides, and the consequences of the same–and much of the data and perspective in the CMOH is based on skiers and cars, not ice climbers, and on the “good” snowpacks skiers tend to seek, not the north-facing facet farms most ice climbs are in. A size 1 is by definition survivable for a skier, but for ice climbers even a small 1 is very much enough to ruin our day by knocking us off on lead or sending us over a cliff edge if walking between steps. A size two that would be relatively easily avoided by a skier on a planar slope is very different than a size 2 filling up a ten-foot wide ice gully 15 feet deep…. Most ice climbs are in nightmare terrain traps, and climbers have been killed in slides that wouldn’t likely ruffle a skier’s feathers much. We’re often also in gully features below big, multi-aspect terrain, so, unlike skiers, anything that slides on any aspect above us will end up hitting us. And we’re there for hours, tied in place. And we can’t adapt fast to changing conditions by pointing the skis downhill and getting out in minutes, or changing aspect. So, I add a level to the danger rating, and have found that to be a more accurate representation of the hazard.
Rule of Thumb (ROT) 2: If the “Danger Rating” is above “moderate” at any altitude I’m in or exposed to I’m generally just avoiding avalanche terrain greater than 2 (challenging) on the Avalanche Terrain Exposure Scale (ATES). There are enough routes to climb that are a 1 or 2 on the ATES scale (see list in link here from Parks Canada here) in the Canadian Rockies that you an almost always go climbing. Even with “moderate low low” climbers have died here. If you’ve spent a lot of time in the snowpack and terrain here then you will probably be able to make your own more nuanced judgements, but to me “Mod Low Low” means “Considerable” in the Alpine, Mod at treeline, and Mod below treeline. I’ve been there when the day goes bad, and you do not want that experience.
Step 2: Mountain Information Network (MIN) Reports, Ice Atlas,
 The blue icons are field reports from climbers and skiers like you, and they often include ice and snow conditions, relevant avalanche observations from skiers, trends, etc. etc. It’s just great stuff, and I go through all the new ones every day. Info on snow, route conditions, obs from the day, this is just great stuff. There is also a “mountain weather” forecast aimed at notable weather events that will effect mountain sports types. You can turn the different “MIN” reports to just ice climbers or skiers, I generally look at all of them. A red dot in the middle of the blue indicates an incident, black a fatality. This is awesome. On the same Avalanche Canada Map, note that there are little “ice climber” icons. These are in most of the common areas, and link to “Ice Atlas” overview of the climbs with ATES ratings, slide paths, useful historical observations, etc. This is excellent into.
Step 3: Social media cruise
Particularly Rockies Ice and Mixed Conditions, the biggest Rockies conditions page, and Rockies Ice Discussions. Both of these groups have a high information to drama ratio compared to the other offerings, and a lot of solid info. Photos, etc. I’m looking both at what’s in and not in, and what aspect/elevation/location those reports are from. For example, if the Sorcerer (high, north facing, Ghost) is in then probably Hydrophobia (same) is too even if there’s no report, same with the Joker. If Cascade (lower, south facing, high flow rate) is in then probably routes like Takkakaw are too (higher so colder but south facing and high flow).
Step 4: General Weather.
I usually start with the Environment Canada general public forecast for Jasper, Lake Louise, Banff, Radium and Bow Valley Provincial Park, or just a few of those. Is anything big coming in? From which direction? Is it going to “upslope,” meaning snow like crazy on the eastern side of the Rockies (Bow Valley Provincial Park) or is it big and wet coming in from the west (Radium etc)?
Also note the Sunrise and Sunset times, found at the bottom of these pages. These matter here, especially Nov-Feb. It’s dark a lot, and you need to plan accordingly.
ROT 3: If the forecast calls for more than 5cms in the 24 hours before or during when I’m climbing I’m going to an ATES 2 or maybe 3 zone only. More than 10cms I’ll wait 24 hours after it winds before heading out into avalanche terrain.
Step 5: Wind and temps
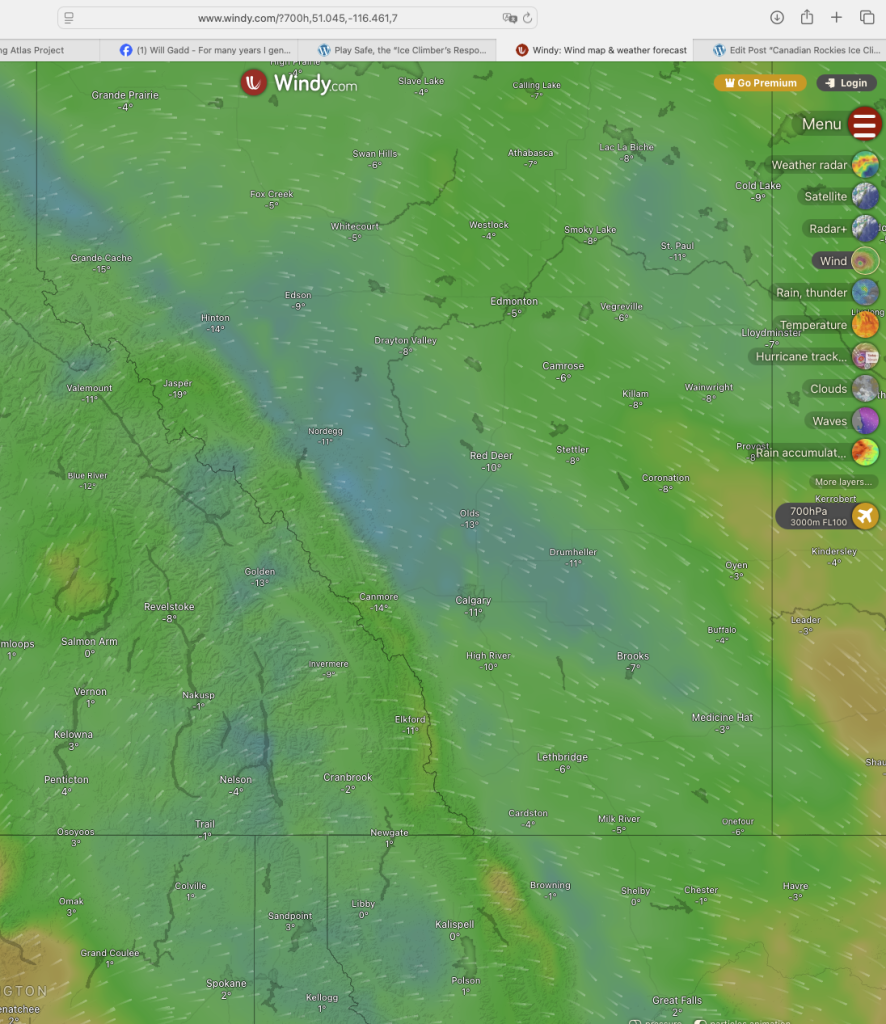
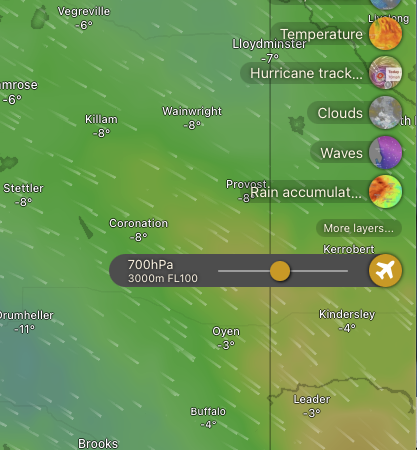
Wind and temperature matter here. Many if not most of our climbing avalanche fatalities here come from above, often as the result of wind transported snow building up in a slab until it overloads the snowpack under it, snow slides, ice climber (s) caught in a terrain trap and die. So, wind matters, a lot. I usually look on Windy.com, zoom into the Canmore-Jasper area or so and see what the surface winds are for the next 24 hours, then go to 6400ft with the altitude slider, do the same, and 10K, do the same. I use feet because aviation globally is in feet, but simple enough to convert, it’s the same info regardless of units at each step.
6400ft + is often about treeline, 10K is about ridge to summit height. Snow transport starts at about 20K, so if there’s any fresh snow left on the windward side of features it’s likely going to move when the forecast is calling for 20+. It starts really moving about 40K. If there’s more than about 30K and enough snowpack to slide then I’m stepping back from ice climbs in avalanche terrain. You’ll probably get away with pushing that, so it’s a question of how long you plan to climb in in your life. Me, I’m five decades in and don’t feel like I have a lot of “probablies” left… If you’re considering the Ghost those surface winds are VERY important, I’ve been stuck in there a few times when the winds picked up and turned 10cm of fluff into truck eating drifts in the late afternoon.
 Switch the primary view to temperature and the shades will give you a pretty good idea of how cold or warm it is. Run the slider from now until the end of the day you’re thinking of climbing on; a high of +6 isn’t a big deal if the temps are below freezing for all but a few hours of the day, but rockfall or solar load could be an issue. It’s often up to a 15C swing between the east and west side of the Rockies, or Jasper to south of Canmore. -25 can be tolerable in the sun in February for a few hours, but climbing at temps below -20 is something I don’t do a lot of, freezing your feet just sucks, and happens a lot more than expected. We all run heated socks up here in winter because we’ve frozen our feet.
ROT 4: If the predicted ridge top winds are over 40K I’m staying out of avalanche terrain in the main ranges. Ghost still likely OK to climb, it’s always windy there, so the snow gets sandblasted into very hard slabs or blown east somewhere. But not always OK in the Ghost, I’ve seen size 3 debris at the base of many of the bigger routes.
ROT 4.5: Just go cragging in the sun when the highs are below -10. Trust me.
Step 5: Now, where to climb?
OK, so now you have general idea of what’s going on: What the snowpack generally is (decent, scary, horrible aren’t colours on the chart but that’s kinda how I look at it) in different areas, what the weather coming in looks like, wind, temps and what routes/aspects/elevations are likely good climbing. Now I start to get more specific based on routes that looked good, lines I want to do, haven’t done, etc. Then it’s back to the same sources but for more specific information:
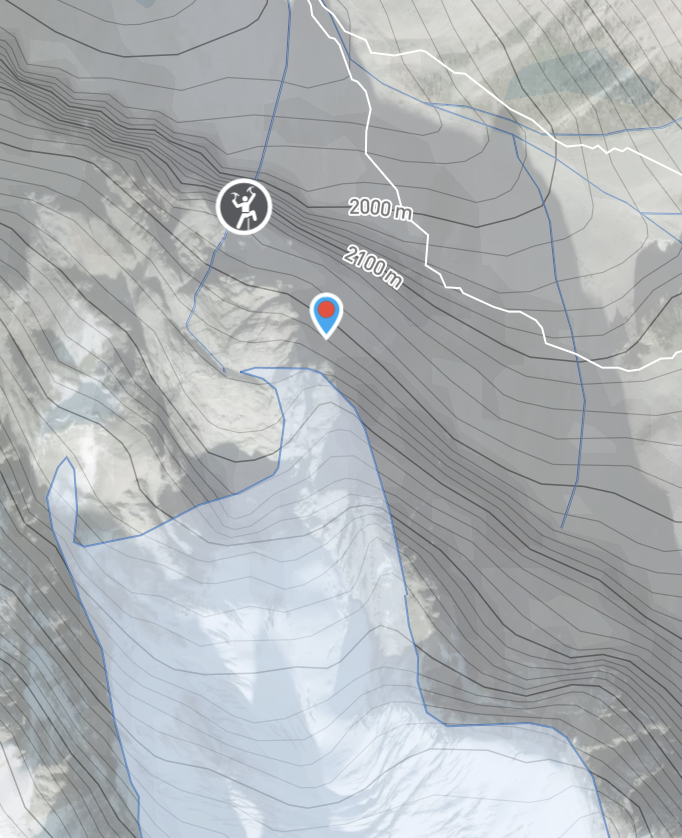
-Back to Avalanche.ca to look at specific climbs on the Ice Atlas. This shows the climb’s avalanche path, some ideas on frequency, ATES rating, and is just really useful info for a lot of the more common climbs in the Rockies. I refer to this regularly, it’s just a great resource developed by Grant Statham, Sarah Hueniken and hundreds of climber survey responses.
– I pull a SpotWX point (this one for the Stanley Headwall Climbs roughly) for the climbs in the top three or so. What are the predicted winds, temps, etc? Predited precipitation amounts are also here. If there is more than 10cms fresh forecast I’m probably going to low ATES climbs. Wind and more than 5cms I’m going to low ATES climbs.
–Road conditions. If I’m pondering going up the Parkfields Iceway (what the locals call the Icefields Parkway for good reason) then it’s good to know if it’s closed (it often is), in decent condition, etc. There’s also a useful Facebook group for Canmore area conditions, and Banff-Jasper conditions. These matter. Also the 4wd groups for the Ghost.
Now I can make real plans! If the overall hazard is higher than “moderate” then let’s say I want to climb about WI4 in ATES 1-2 terrain. Check the Ice Atlas, App, social, etc: Say Evan Thomas, Weeping Wall look good. But the road conditions on the Parkway are hideous, better go east so Evan Thomas? But it’s brutally cold on the Rockies side of the divide (I don’t climb multi-pitch routes with high temp of less than -10 or so, just not worth it anymore), so maybe the Columbia Valley side where it’s usually warmer, about 5C warmer or more over there. Gibraltar Wall looks cool, saw a Social report it was in, plus Cascade is and that’s roughly the same for too aspect, short approach, in the sun, low avi hazard, boom! But I better have a plan B and C too, so maybe Green Monster if the roads are bad, Haffner if all else fails. Haffner is always where we end up when everything else fails :).
ROT 5: Only go for the “big rigs” when the hazard is “Low.” Most of the “classic” big routes are below big avalanche terrain, or require being in it to reach. Ghost routes are generally lower hazard so you can do Hydrophobia or the Sorcerer with more hazard, but they both have cornices, and I have seen size 2 debris in each area. Hydro in particular has a slope above it on the right that gets wind loaded and pulls out even on sunny days.
If you don’t know the aspect, ATES, etc. of routes in the Canadian Rockies then here’s a plug for Ice and Mixed Climbing, an App Steven Rockarts and I did. It has every known route in the Rockies, with as much information as we can provide on the location, approach, etc. etc. Buy it once, and you can sort by aspect, ATES, WI difficult, etc. etc. I use my own App a lot for the final planning stages of a day out. Very useful, I basically made it to help us figure out climbs in the Rockies. Also has good areas for toproping,
A few other resources:
Parks Avalanche Terrain Exposure Scale.
Why Falling off on ice sucks
Ice Atlas: Critical Information.
Posted in: Blog
No comments yet... add your voice!
I'm more than happy to hear your thoughts on what I've written. Please note that all comments will be moderated before publishing. Thank you for joining the conversation.